

For BMW owners, the driving experience is about more than performance — it’s about every sensory detail, including the soundtrack that accompanies every journey. Yet even in a precision-engineered vehicle, the factory audio system often falls short of truly immersive sound. That gap between good and exceptional is exactly where Linux Clear Screen steps in, offering a sophisticated audio upgrade designed specifically to complement BMW’s engineering philosophy.
Linux Clear Screen represents a new generation of in-car audio technology, blending open-source flexibility with hardware-level precision to deliver sound quality that rivals dedicated home audio systems. However, many BMW owners hesitate when faced with complex installation requirements, unclear compatibility details, or concerns about what happens after the purchase — particularly around warranty coverage and customer support.
This guide addresses all of those concerns head-on. Whether you’re a tech-savvy enthusiast or a first-time upgrader, you’ll find clear, actionable information covering everything from understanding the technology itself to navigating the full installation process. Beyond setup, we’ll explore the after-sales service ecosystem, warranty terms, and support channels that protect your investment long after installation day. Upgrading your BMW’s audio system should be a rewarding experience — and with the right guidance, it absolutely can be.
Understanding Linux Clear Screen: Revolutionizing BMW Audio Systems
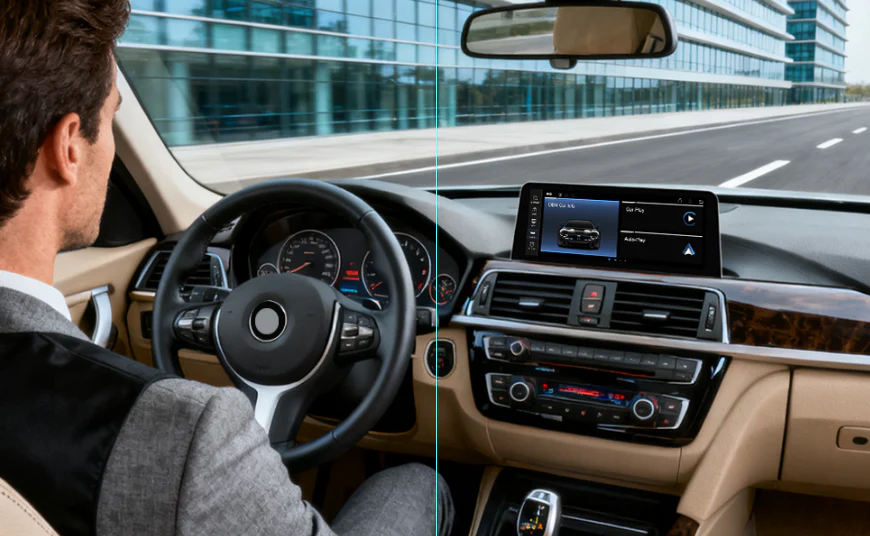
Linux Clear Screen is an advanced in-car audio platform built on an open-source Linux foundation, engineered to replace or augment the factory head unit in BMW vehicles. At its core, it combines a high-performance digital signal processor with a responsive touchscreen interface, creating a unified control center for audio playback, connectivity, and system management. Unlike generic aftermarket solutions, Linux Clear Screen is developed with BMW’s CAN bus architecture in mind, allowing it to communicate directly with the vehicle’s existing wiring and speaker networks without requiring extensive modifications.
Integration with BMW’s native audio infrastructure is one of its defining strengths. The system taps into the existing amplifier network and speaker configuration, meaning owners of models with premium Harman Kardon or Bang & Olufsen setups can preserve those components while dramatically improving source quality and signal processing. Compatibility spans a wide range of BMW series, including the 3 Series, 5 Series, X3, X5, and select 1 Series models, with model-specific firmware profiles ensuring accurate system recognition.
Key Features and Technical Specifications
Linux Clear Screen delivers high-resolution audio processing supporting formats including FLAC, DSD, and aptX HD Bluetooth streaming, ensuring studio-grade playback from both local storage and wireless sources. A fully customizable parametric equalizer lets drivers shape frequency response to match their specific speaker configuration and acoustic environment. Additional features include Android Auto and Apple CarPlay integration, OTA (over-the-air) software updates, and a multi-zone audio output that supports independent front and rear channel control. The platform’s open-source nature also means regular community-driven improvements, making it a forward-looking choice over proprietary alternatives that quickly become obsolete.
Benefits of Upgrading to Linux Clear Screen for Your BMW
The most immediate transformation Linux Clear Screen delivers is acoustic. Where factory systems often compress dynamic range to protect against clipping, this platform’s advanced DSP preserves the full spectrum of recorded audio — crisp, detailed highs that reveal instrument texture, and bass frequencies with genuine weight and definition rather than the muddy thump common in OEM setups. Drivers who regularly stream high-resolution audio will notice the difference within minutes of their first playback session.
Beyond raw sound quality, the user experience shifts considerably. The responsive touchscreen interface consolidates audio management, source switching, and connectivity settings into a single, logically organized panel. Pairing a phone, switching between Bluetooth and wired CarPlay, or adjusting a specific frequency band mid-drive becomes intuitive rather than distracting. This operational fluency directly contributes to safer, more enjoyable driving — you spend less time navigating menus and more time focused on the road.
For BMW owners who view their vehicle as a long-term investment, the upgrade carries practical financial logic as well. A professionally installed, high-quality audio system enhances perceived vehicle value, particularly appealing to enthusiast buyers should you ever sell. The open-source architecture also means the system evolves through software updates rather than becoming obsolete, protecting the value of your investment over time. Taken together, improved sound fidelity, streamlined controls, device compatibility, and lasting relevance make Linux Clear Screen one of the most well-rounded audio upgrades available for BMW owners who refuse to compromise on their in-cabin experience.
Step-by-Step Guide to Product Installation for BMW Owners
Pre-Installation Checklist and Safety Measures
Preparation determines whether installation goes smoothly or becomes a frustrating ordeal. Before touching any component, disconnect the negative battery terminal and allow the vehicle’s capacitors to discharge for at least 15 minutes — this prevents accidental airbag deployment and protects sensitive electronics. Gather the following tools: a trim removal pry kit, Torx T20 and T25 screwdrivers, a multimeter, electrical tape, and zip ties. Download the model-specific firmware profile for your BMW from the Linux Clear Screen portal before you begin, and back up your existing iDrive settings if applicable. Confirm that your specific BMW model and production year appear on the official compatibility list, as wiring harness configurations vary between production runs even within the same series. If you’re sourcing supplementary components such as adapter harnesses or mounting hardware, suppliers like PEMP Car Audio carry BMW-specific accessories that are worth cross-referencing against your vehicle’s production year.
Detailed Installation Process and Configuration
Begin by carefully removing the center console trim panels using plastic pry tools — metal tools risk scratching or cracking BMW’s interior finishes. Unscrew and slide out the factory head unit, then disconnect the OEM wiring harness connectors. Linux Clear Screen units ship with a model-matched adapter harness, so plug this directly into the factory connector without cutting any original wiring, preserving your ability to revert if needed. Slide the new unit into the DIN cavity, secure it with the provided mounting brackets, and reconnect the harness. Power the vehicle on without starting the engine, navigate to the system setup menu, and select your BMW model profile. Run the automatic speaker calibration routine, which uses the built-in microphone to measure cabin acoustics and apply corrective DSP settings. Once calibration completes, perform a full audio test across all channels before reassembling the trim panels.
Troubleshooting Common Installation Issues
If the unit powers on but produces no audio, first verify that the amplifier turn-on wire is correctly connected — this is the most common oversight in BMW installations where external amplifiers require a dedicated trigger signal. A blank or flickering screen typically indicates a loose power ground connection; reseat the ground wire at both the unit and chassis attachment point. Software recognition errors, where the system fails to identify the BMW model correctly, are resolved by manually selecting the vehicle profile in the settings menu and performing a factory reset followed by re-calibration. If CAN bus communication errors appear, confirm that the adapter harness is fully seated — partial connections cause intermittent data faults. For persistent issues that don’t resolve through these steps, avoid further disassembly and contact Linux Clear Screen’s technical support line directly, providing your VIN, BMW model year, and a description of the error message displayed.
Navigating After-Sales Service and Customer Support
Purchasing and installing Linux Clear Screen is only the beginning of your relationship with the product. What happens in the months and years that follow — when a software update behaves unexpectedly, a connectivity feature stops responding, or you simply want to optimize your equalizer settings for a new speaker upgrade — is where after-sales service becomes the defining factor in overall satisfaction. A strong support ecosystem transforms a one-time purchase into a continuously improving experience.
Types of After-Sales Services Available
Linux Clear Screen’s after-sales framework covers several distinct service categories. Remote diagnostics allow support technicians to analyze system logs you submit through the owner portal, identifying software conflicts or misconfigured DSP settings without requiring a physical visit. For hardware-related concerns that can’t be resolved remotely, on-site support partnerships with certified automotive audio installers are available in major metropolitan areas — contact the support team to locate the nearest authorized service point. Regular firmware updates are pushed through the OTA system automatically, but the support portal also maintains a manual update archive for owners who prefer to control their update schedule. Additionally, scheduled system check-ups are available through the portal, where technicians review your unit’s performance data and recommend calibration adjustments based on cumulative usage patterns.
How to Effectively Engage with Customer Support
Getting the most from customer support starts before you make the call or submit the ticket. Have your unit’s serial number, your BMW’s VIN, the current firmware version displayed in the system settings menu, and a clear written description of the issue ready in advance. Support channels include a dedicated phone line, an email ticket system with guaranteed 24-hour response, and a live chat option available through the owner portal during business hours. When describing your issue, specify exactly when it occurs — during startup, after a specific input source switch, or following a particular update — as this context dramatically accelerates diagnosis. After receiving a resolution, follow up within 72 hours if the fix doesn’t hold, referencing your original ticket number to maintain continuity with the same support agent familiar with your case history.
Warranty Coverage and Long-Term Support Assurance
Every Linux Clear Screen unit comes backed by a two-year limited warranty covering manufacturing defects in both hardware components and factory-installed firmware. Labor costs for warranty repairs performed through authorized service partners are included, meaning you won’t face unexpected bills for issues that originate from the product itself. The warranty does not cover physical damage from improper installation, water intrusion, or modifications made outside official guidelines — which is precisely why following the installation steps outlined earlier matters beyond just performance outcomes.
Filing a warranty claim is straightforward. Log into the owner portal, navigate to the warranty section, and submit your unit’s serial number alongside a description and photo documentation of the issue. A support agent reviews submissions within 48 hours and either authorizes a replacement unit or schedules a repair through the nearest certified installer. Keep your original purchase receipt and installation date on record, as these establish your warranty start date.
For owners looking beyond the standard coverage window, Linux Clear Screen offers an extended support subscription that provides continued OTA updates, priority access to the technical support team, and discounted rates on hardware servicing for up to five years post-purchase. The active user community forum also serves as a valuable long-term resource — experienced owners and developers regularly share calibration profiles, troubleshooting solutions, and compatibility notes for newer BMW production runs, alongside recommendations for compatible CarPlay accessories from brands such as PEMP Car Audio. Together, formal warranty protection and this broader support network ensure that your audio investment continues delivering value well past installation day.
Elevate Your BMW Audio Experience with Confidence
Upgrading your BMW’s audio system with Linux Clear Screen is one of the most impactful enhancements you can make to your in-cabin experience. Throughout this guide, we’ve covered the technology’s foundations — how it integrates with BMW’s existing infrastructure, the acoustic and usability benefits it delivers, and the precise steps required for a successful installation. Equally important, we’ve detailed the after-sales ecosystem that protects your investment: responsive customer support channels, a clear warranty process, and extended coverage options that keep the system performing at its best for years ahead.
The combination of open-source flexibility, BMW-specific engineering, and a robust support network makes Linux Clear Screen a genuinely future-proof choice rather than a short-term fix. Whether you’re drawn by the promise of studio-quality sound on your daily commute or the confidence of knowing expert help is always accessible, this upgrade delivers on both fronts.
Now is the right moment to act. Review your BMW’s compatibility, gather your installation tools, and take that first step toward a dramatically richer driving experience. With the right preparation and the support resources outlined here, the transition from factory audio to something truly exceptional is well within reach — and the difference will be apparent from the very first drive.


